Showing posts with label G321 Preliminary task. Show all posts

Thursday, 20 October 2011

Preliminary Task Evaluation

Question 1 What planning did you do for your filming task, and how did this planning aid the filming?
In our groups we created an individual story board based on the storyline we had created as a group. We made individual storyboards because we might have all wanted to use different cuts, which in the end we did use different cuts in our groups, so this would establish the differences in ideas. We also created a shot list which re-enforces our storyboard as a reference to the specific shots we each wanted to use and to each character, it has the same purpose as the storyboard but it is in a different format. I found that the Shot list was easier, quicker and simpler to produce than the storyboards. The storyboard labels what actions the camera should be doing, (type of shot) what is happening in the scene and who should be in it. It also lists how many shots we will be shooting, no doubt the filming of our preliminary task is slightly different to the storyboard but it gives us an idea of what our shots would look like and an overview of the film as a whole. These methods of planning helped us gain an idea of how long our preliminary task would be and how it would look, we made a few amendments whilst filming. We filmed too many shots for the walking down the corridor; we were over complicating the situation by trying to film in too many places. We attempted to film in the Arc and in the science corridor. Because of this we started to go off-storyboard and digress away from our planning. We made it harder for ourselves by doing this and managed to accidently film over shots we had already completed. We filmed over the whole conversation that we had previously filmed, we became incredibly frustrated and angry at ourselves. Ultimately we decided to film the whole task again, however they turned out better than the ones before so it ended well. If we had not completed the planning then the result of us filming over what we had already filmed would have been a much longer process for trying to stay within the deadlines if we had not had the shot list and story board. It made me realise how important recording your planning really is and how much of a help it can be! For my Thriller I will definitely use the same methods of planning.

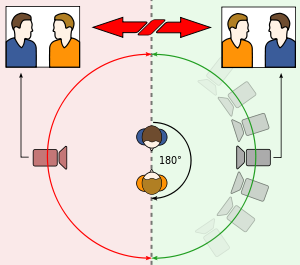
Question 2 What is the 180 degree rule, and how is this important to the filming task?
The 180 degree rule is probably one of the most important rules in filming. Breaking it could cause the audience huge confusion. I find trying to describe it proves to be very hard. The 180 degree rule is to not go past an invisible line which splits down the middle of the conversation of scene. (Look at the image on the right) A classic example of where the 180 degree rule is put into practice is football or rugby games. the camera stays on one side of the pitch as to not cause confusion as to which team is scoring at which end. The camera would stay on the same side of the pitch.
Another classic demonstration of the 180 degree rule is the opening scene in pulp fiction. The camera stays on the same side the whole time as not to cause confusion. It also performs a very clear shot reverse shot. This is almost a perfect example of the 180 degree rule. Pumpking and Honey Bunny are talking in a cafe, but the shots they use, especially the mediaum/long shot, establishing how crazy they really are. This start sets the mood and the expectations for the rest of the thriller film. The end result of this film is that Pumpkin and Honey Bunny decide to rob the diner as they realise they can make money from the tills and the customers. When they make a move to rob it, it shows a really different side to both of the characters and how ruthless they both can be.

Question 2 What shot types and camera angles did you use in your filming task and to what effect?
We used a variety of camera shots in our Preliminary task. First of all we planned which ones we would use. We planned to use, Point of view shot, Tracking shot, over the shoulder shot, birds eye view shot, medium close up, extreme close up and long shot. However we had problems with filming the birds eye view shot. We could not find anywhere to film it where we could have the camera pointing straight down. We solved this problem by finding a balcony area, which was unfortunately very busy a lot of the time. Therefore we stayed late to film when there were less people to be in the shot.We ended up filming in the science corridor. We also struggled with the over the shoulder shot, because the first time we filmed it, we didn't do the characters sat directly opposite each other, but then when we managed to accidently  film over what we already filmed, the second time we made sure we were doing it right. We positioned ourselves (the characters) to face each other opposite! We used some shots for effect, but some just because it was practical to use, like for example the over shoulder shot, we used this because it clearly showed the conversation between the two characters and where they were positioned during this conversation. By filming the shot of Lyndsey running away from behind it shows how she is in such a rush that she leaves behind the other character. The effect of having the characters sat opposite each, enables the camera angles to have the effect of someone looking over the shoulder of the character who is listening, showing the actions of the speaking character. The effect of the birdseye view is to establish where they are walking, also the surroundings and if anyone else is there. 

Question 4
I have had some previous experience of editing, but only with movie maker and another one (of which I can not remember) Adobe Elements was new to me have developed my skills in that I now know how to use a new editing programme which makes me more versatile when it comes to generally editing videos. I have also learnt the easiest way of editing on that specific programme ‘Adobe Elements’ I feel I am fairly confident using the programme, having had previous experience editing videos, it is pretty easy to understand and work out, also the programme isn’t too complicated which makes the process a lot smoother, you encounter less problems whilst carrying out the editing process. I think once you have ‘captured’ all of the footage you need, it is pretty basic, but I have done it before so that worked to my advantage. The only problem we encountered whilst editing was the cameras, some of the leads were broken and some of the cameras not charged which made the process take a lot longer than it should have done which was mildly frustrating. However it only took us about an hour to edit once all of the footage was on and saved. My partner and I had both edited before which made the experience a lot smoother than it would have been. I am pleased with the outcome of our edit and cut, hopefully it will be different to others.

Thursday, 6 October 2011

Preliminary Task Evaluation

1.       What planning did you do? How was this useful, and how did you change from your plans?

In our group we each created our own story board to plan out the happenings in our preliminary task. The storyboard labels what actions the camera should be doing (type of shot) what is happening in the scene and who should be in it. It also lists how many shots we will be shooting, no doubt the filming of our preliminary task will differ slightly to the storyboard but it gives us an idea of what our shots would look like and an overview of the film as a whole.
We also created a shot list, which simply listed all the shots we had to film of the subjects acting. It clearly shows the situation, who is in the scene and where we are filming before the list of shots. I think the list or shots are a lot clearer than the story board and I preferred using that to the story board, it is less time consuming and easier and simpler to produce.
These helped us gain an idea of how long our preliminary task would be and how it would look, we made a few amendments whilst filming; we filmed too many shots and started to go off-storyboard and over complicated the task. We made it harder for ourselves by doing this and managed to film over shots we had already completed. Ultimately we had to film a lot of the ending shots again but they turned out better than the ones before so it ended well.

2.       What camera skills have you developed? How confident are you with using the cameras, and has this confidence changed during the project? Give details of specific camera skills/techniques you have developed/improved, and include areas where you lack confidence/need to improve?

Having completed camera work before I already had an understanding of how camera angles have an effect on the audience and what they portray. For example the worm’s eyes view shot is often used to indicate fear, for the audiences view it shows events from the character’s venerable perspective. I have my own camera at home so I often get to use it to progress my skills in camera work. Although I have learnt about new types of shots and following that the effects that they have on the audience and what they see from the character’s perspective. I feel I have improved my understanding of how ‘working title films’ and big films are made, I can’t watch a film now without thinking about what type of shot it is, it has made me more aware of how films are shot. I think my editing side is strong, in the past I have made my own videos and enjoyed editing them together, I also filmed music videos with my friends in my spare time, and so I have had experience in trying to achieve the repetitive effect that videos aim to achieve.
3. What editing skills have you developed? How confident are you with using the editing program? Give details of specific editing skills/ techniques you have developed/improved, and include areas where you lack confidence/need to improve?
I have developed my skills in that I now know how to use a new editing programme which makes me more versatile when it comes to generally editing videos. I have also learnt the easiest way of editing on that specific programme ‘Adobe Elements’ I feel I am fairly confident using the programme, having had previous experience editing videos, it is pretty easy to understand and work out, also the programme isn’t too complicated which makes the process a lot smoother, you encounter less problems whilst carrying out the editing process. I think once you have ‘captured’ all of the footage you need, it is pretty basic, but I have done it before so that worked to my advantage. The only problem we encountered whilst editing was the cameras, some of the leads were broken and some of the cameras not charged which made the process take a lot longer than it should have done which was mildly frustrating. However it only took us about an hour to edit once all of the footage was on and saved. My partner and I had both edited before which made the experience a lot smoother than it would have been. I am pleased with the outcome of our edit and cut, hopefully it will be different to others.

Monday, 26 September 2011

Shot List

Situation – talking about the weekend and a job interview.
Where – filming in school, the arc.
Who – Emily and Lyndsey

1)      Point of View shot of Emily walking down the corridor, cut to
2)      Tracking shot of Emily walking down the corridor, cut to
3)      Over the Shoulder of Emily walking into a room/opening the door, cut to
4)      Birds eye view shot of Lyndsey sleeping on her books, cut to
5)      Medium close up of Lyndsey waking up and book falling on floor, Emily walking in and sitting down next to Lyndsey, cut to
6)      Over the shoulder, shot/reverse shot of conversation between Emily and Lyndsey, cut to
7)      Extreme close up of phone, cut to
8)      Long shot of Lyndsey running off for job interview. 

Wednesday, 21 September 2011

Camera Shots


Long Shot
In filming making, or camera use, a long shot is used to establish a location of the scene and what is happening in the scene, to place the character or object in some relation to its surroundings. Typically it shows the entire object or human figure. It is also to show where the action that is taking place and what is going on.


Tilt Shot
Tilting the camera in film making is creating the effect of confusion or the character, sometimes disorientation, and to be put into an example, it could be used effectively in a nightmare. It is often used to portray the Psychological uneasiness or tension in the subject being filmed.


Tracking Shot
In filming, a tracking shot can be very effective when you want to cause tension or uneasiness. The tracking shot involves just following the character or object around, usually on some kind of track or wheeled platform to track the scene. It is used to create anxiety in the audience as you would find out the same time that the subject did, what was to happen.


Extreme Close-Up
The extreme close up shot is used to closely identify an action. It is often used in horror films, to show anxiety, or nervousness. It can also be used to concentrate on the subject’s detail intensely. You would normally need a reason to get this close up to the subject and expect to see it in dramatic scenes.


Worms Eye View
The worm’s eye view shot is used often to indicate fear, from the audiences view it shows events from the character’s vulnerable perspective. It shows the scene from the ground, as if you are a worm.


High Angle 
The High Angle shot shows the object to be insignificant, powerless and vulnerable. The camera should be located above the eye line. High angle shots are usually used in film to make the moment more dramatic or if there is someone at a higher level that the character below is talking to. 


Point Of View
This shot gives the audience the impression that you are the subject, you see what the subject sees through their eyes. It is usually established by being positioned between a shot of a character looking at something, and a shot showing the character's reaction


Bird’s Eye View
In filming, a bird's-eye shot refers to a shot looking directly down on the subject. This shot can be used to give an overall establishing shot of a scene, or to emphasise the smallness or insignificance of the subjects. It adds to audience appeal, it gives a different view on what is going on in the scene.


Medium Close-Up
This shot brings focus to the subject. It brings attention to what the subject is doing. This shot shows the face more clearly, without getting uncomfortably close.


Over The Shoulder
This shot gives the audience the impression that somebody is following the subject; it places the audience in the position of the character or possibly the follower. It is also often used when two subjects are conversing, to show the view of the speaking subject from the others perspective.